Rustの環境構築(Emacs)
このエントリはRust 3 Advent Calendar 2020の2日目の記事です。前回はstnaoさんでRust,Wasm,Dockerで"hello world"をする MacOs catalinaでした。
アドベントカレンダー埋まってないところを埋める担当のκeenです。そういえばRustの環境構築の記事を最近みかけないなと思ったので書きます。 それと私がEmacs使いなのでEmacsのセットアップや開発方法なども記します。
コンパイラのインストール
rustupを使います。
以下のrustup.rsにアクセスしたら出てくるとおり以下のコマンドを叩くだけです。
$ curl --proto '=https' --tlsv1.2 -sSf https://sh.rustup.rs | sh
たまに得体の知れないコマンドシェルスクリプトを直接 sh に流すのを嫌う人がいますが、
そもそも得体のしれないバイナリ(rustコンパイラ)をインストールしようとしてるので気にしすぎでしょう。
さて、上記コマンドを実行すると以下のようにインストールが走ります。
info: downloading installer

Welcome to Rust!

This will download and install the official compiler for the Rust
programming language, and its package manager, Cargo.

Rustup metadata and toolchains will be installed into the Rustup
home directory, located at:

  /home/shun/.rustup

This can be modified with the RUSTUP_HOME environment variable.

The Cargo home directory located at:

  /home/shun/.cargo

This can be modified with the CARGO_HOME environment variable.

The cargo, rustc, rustup and other commands will be added to
Cargo's bin directory, located at:

  /home/shun/.cargo/bin

This path will then be added to your PATH environment variable by
modifying the profile files located at:

  /home/shun/.profile
  /home/shun/.bash_profile
  /home/shun/.bashrc
  /home/shun/.zshenv

You can uninstall at any time with rustup self uninstall and
these changes will be reverted.

Current installation options:


   default host triple: x86_64-unknown-linux-gnu
     default toolchain: stable (default)
               profile: default
  modify PATH variable: yes

1) Proceed with installation (default)
2) Customize installation
3) Cancel installation
選択肢がでてきますが、そのまま1を選びましょう。
1を選ぶとさらに進んでコンパイラツールチェーンのインストールがはじまります。
info: profile set to 'default'
info: default host triple is x86_64-unknown-linux-gnu
info: syncing channel updates for 'stable-x86_64-unknown-linux-gnu'
info: latest update on 2020-11-19, rust version 1.48.0 (7eac88abb 2020-11-16)
info: downloading component 'cargo'
info: downloading component 'clippy'
info: downloading component 'rust-docs'
 13.3 MiB /  13.3 MiB (100 %)  10.7 MiB/s in  1s ETA:  0s
info: downloading component 'rust-std'
 22.0 MiB /  22.0 MiB (100 %)  10.7 MiB/s in  2s ETA:  0s
info: downloading component 'rustc'
 66.2 MiB /  66.2 MiB (100 %)  10.3 MiB/s in  6s ETA:  0s
info: downloading component 'rustfmt'
info: installing component 'cargo'
info: using up to 500.0 MiB of RAM to unpack components
info: installing component 'clippy'
info: installing component 'rust-docs'
info: installing component 'rust-std'
 22.0 MiB /  22.0 MiB (100 %)  15.7 MiB/s in  1s ETA:  0s
info: installing component 'rustc'
 66.2 MiB /  66.2 MiB (100 %)  18.1 MiB/s in  3s ETA:  0s
info: installing component 'rustfmt'
info: default toolchain set to 'stable-x86_64-unknown-linux-gnu'

  stable-x86_64-unknown-linux-gnu installed - rustc 1.48.0 (7eac88abb 2020-11-16)


Rust is installed now. Great!

To get started you need Cargo's bin directory ($HOME/.cargo/bin) in your PATH
environment variable. Next time you log in this will be done
automatically.

To configure your current shell, run:
source $HOME/.cargo/env
最後に、表示されたコマンドを読み込んで現在のシェルで有効にします。
$ source $HOME/.cargo/env
ツールのインストール
フォーマッタ、リンタ
公式で配布されているrustfmt(フォーマッタ)とclippy(リンタ)が鉄板です。 インストールは…既に上記の方法でインストールされています。 確認してみましょう。
$ which rustfmt
/home/shun/.cargo/bin/rustfmt
$ which cargo-clippy
/home/shun/.cargo/bin/cargo-clippy
もしインストールされていなかったら下記のコマンドでインストールできます。
$ rustup component add rustfmt clippy
LSPサーバ
LSPはマイクロソフトが提唱した言語処理系とエディタ/IDEがやりとりするためのプロトコルです。 ざっくり言うとLSPをサポートしている言語ならEmacsがEclipseやIntelliJ並にリッチな環境になります。
さて、RustのLSPサーバの状況なのですが、ツールが2つあります。
1つがrlsで現行の公式推奨のLSPサーバです。
もう1つがrust-analyzerで、一応実験的な実装とされています。 しかし出来がよく、rust-analyzerを公式のツールにしようとする動きもあります。
ここでは両方のインストール方法を紹介するので好きな方をインストールしてみて下さい。
因みに私はrust-analyzerを使っています。
RLS
rustupでインストールできます。
$ rustup component add rls
rust-analyzer
毎週バイナリリリースがGitHubに作られるので、そこからダウンロードして使います。
私はLinux(Ubuntu)使いでかつ、 ~/bin にパスを通しているので以下のコマンドを毎週叩いています。
$ curl -L https://github.com/rust-analyzer/rust-analyzer/releases/latest/download/rust-analyzer-linux -o ~/bin/rust-analyzer
rust-analyzerは毎週更新されるので使う方はGitHubの右上にある[Watch]から[Custom]の[Releases]にチェックを入れて、毎週のリリースの通知を受け取るとよいでしょう1
その他
cargo install でRust製ツールをインストールできます。
個人的には cargo-editをよく使っています。
以下のコマンドでインストールできます。
$ cargo install cargo-edit
あとで紹介するcargo-minor-modeでもサポートがあるのでおすすめです。
エディタ(Emacs)のセットアップ
私がEmacs使いなのでEmacsのセットアップ方法を紹介します。 因みにRustの開発に一番使われているのはVSCodeらしいです。
使ってるパッケージは以下です。
- rust-mode: Rustのメジャーモード
- lsp-mode: 上述のLSPのEmacsサポート。Rustサポートも同梱されます。
- lsp-ui: LSPの表示レイヤー
- cargo: CargoをEmacsから呼び出せるキーバインド
私はuse-packageユーザなので以下のように設定をしています。
(setq exec-path (cons (expand-file-name "~/bin") exec-path))
(setq exec-path (cons (expand-file-name "~/.cargo/bin") exec-path))

;;;;;;;;;;;;;;;;;;;;;;;;;;;;;;;;;;;;;;;;;;;;;;;;;;;;;;;;;;;;;;;;
;;; #rust

(use-package rust-mode
  :ensure t
  :custom rust-format-on-save t)


(use-package cargo
  :ensure t
  :hook (rust-mode . cargo-minor-mode))

;;;;;;;;;;;;;;;;;;;;;;;;;;;;;;;;;;;;;;;;;;;;;;;;;;;;;;;;;;;;;;;;
;;; #lsp

(use-package lsp-mode
  :ensure t
  :hook (rust-mode . lsp)
  :bind ("C-c h" . lsp-describe-thing-at-point)
  :custom (lsp-rust-server 'rust-analyzer))
(use-package lsp-ui
  :ensure t)
1つづつ解説していきます。
(setq exec-path (cons (expand-file-name "~/bin") exec-path))
~/bin を exec-path に加えます。私はrust-analyzerをここにインストールしているので必要です。
(setq exec-path (cons (expand-file-name "~/.cargo/bin") exec-path))
~/.cargo/bin を exec-path に加えます。cargoやrustfmtなどをEmacsから使うために必要です。
(use-package rust-mode
  :ensure t
  ; ...
)
rust-modeのパッケージを使う宣言です。なければインストールします。
:custom rust-format-on-save t
ファイルを保存する度に rustfmt を適用します。
(use-package cargo
  :ensure t
  ; ...
)
cargoのパッケージを使う宣言です。なければインストールします。
:hook (rust-mode . cargo-minor-mode)
rust-mode-hook に cargo-minor-mode を追加します。
これで rust-mode が起動するときは cargo-minor-mode がonになります。
(use-package lsp-mode
  :ensure t
  ; ...)
lsp-modeのパッケージを使う宣言です。なければインストールします。
:hook (rust-mode . lsp)
rust-mode-hook に lsp を追加します。
これで rust-mode が起動するときは lsp-mode がonになります。
:bind ("C-c h" . lsp-describe-thing-at-point)
lsp-mode では C-c h に lsp-describe-thing-at-point を割り当てます。
因みに lsp-rust のデフォルトのLSPバックエンドはrust-analyzerです。
RLSを使う方は :custom (lsp-rust-server 'rls) などの設定が必要になるでしょう。
(use-package lsp-ui
  :ensure t)
lsp-uiのパッケージを使う宣言です。なければインストールします。
その他お好みで設定して下さい。
設定した環境の使いかた
基本編
基本は自動で動いてくれます。ちょっとプロジェクトを作ってテストしてみましょう。
cargo new でプロジェクトを作ります。
$ cargo new test-project
     Created binary (application) `test-project` package
プロジェクトをEmacsで開いてみましょう(find-fileで src/main.rs を選択)。
lsp-modeがワークスペースをインポートするか尋いてくるので i と入力してインポートします。
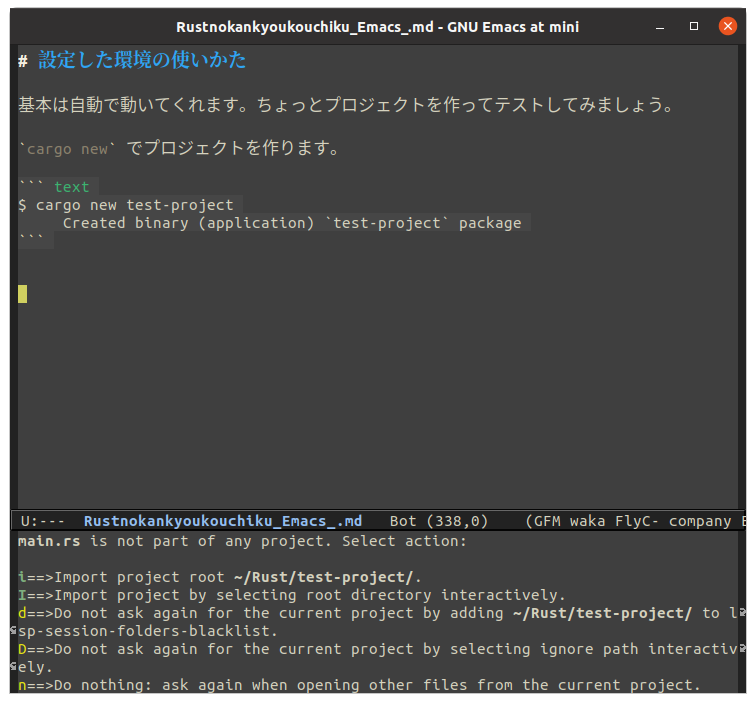
初回はrust-analyzer/rlsの初期化に少し時間がかかります。
cargo new で動くプロジェクトが作られているのでcargo-minor-modeのキーバインドを使って走らせてみましょう。
C-c C-c r です。
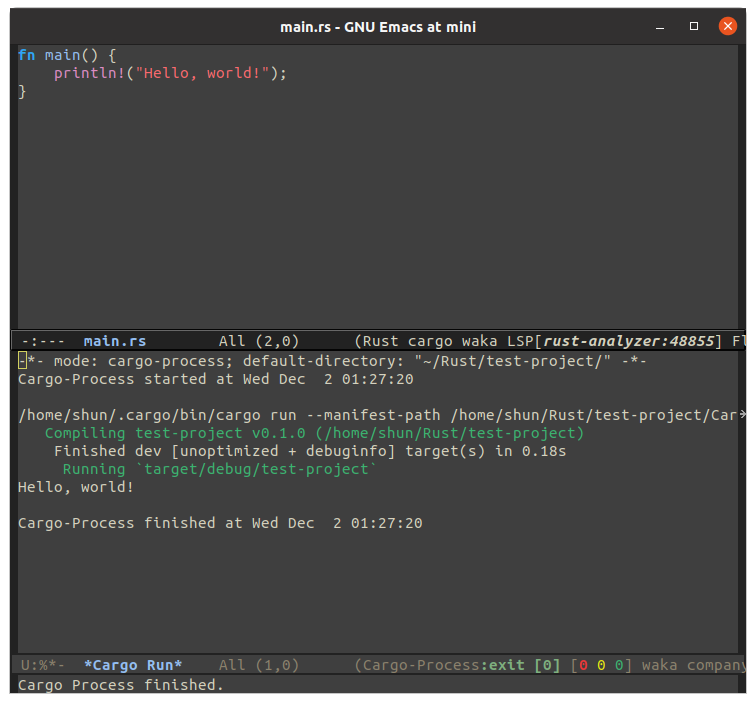
下のウィンドウに “Hello world!” と表示されていますね。成功です。
それではlsp-modeの補完を試してみましょう。
ファイルの先頭に use std::collections::HashMap; と入力しようとしてみて下さい。
するとcompanyで補完がされるはずです。
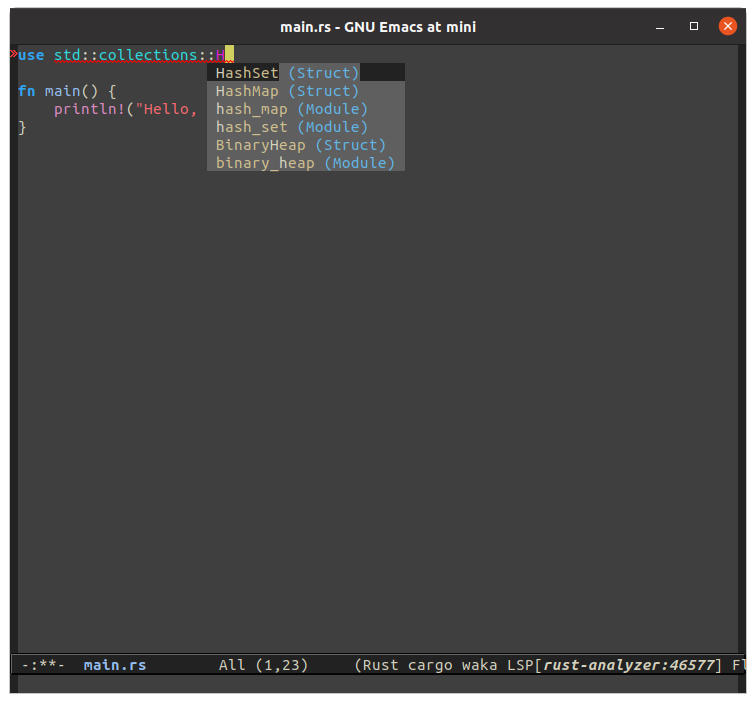
次にツールでインストールしたcargo-editを使っていみましょう。cargo-minor-mode経由で使えます。
C-c C-c a RET regex RET と入力してみて下さい。
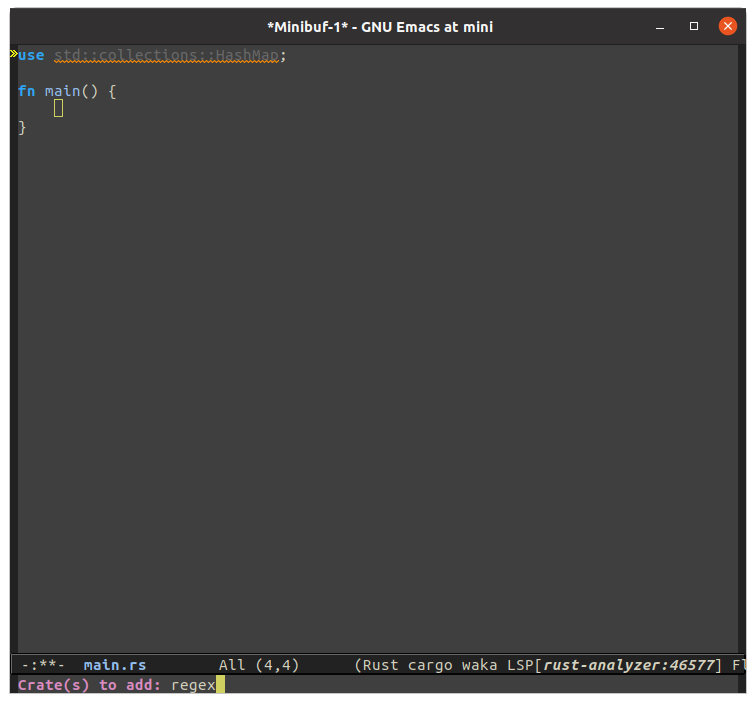
cargo-editでインストールされたサブコマンド、 cargo add を使ってパッケージを追加してくれます。
これは Cargo.toml の [dependencies] に regex = "最新のバージョン" を追記する指示です。
どうやらlsp-modeが追記を読み込んでくれないようなので M-x lsp-restart-workspace でリロードしましょう。
今追加したregexパッケージを使ってみましょう。
let regex = Regex::new("foo.*").unwarp(); と入力しようとしてみて下さい。
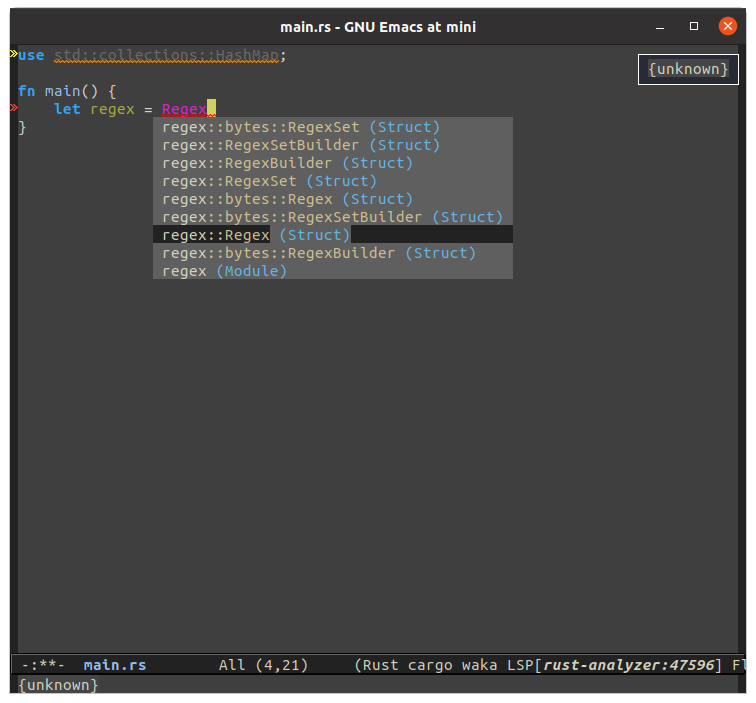
補完候補がでてきます。
このうち regex::Regex を選択するとファイルの先頭に use regex::Regex; が自動で追記されます。
なんとオートインポートまでされるんですね。
なんかドキュメントがオーバーレイ表示されて邪魔な場合は M-x lsp-ui-doc-hide とでもしてみて下さい。
続いて関連関数の new を入力するシーンでももちろん補完されます。
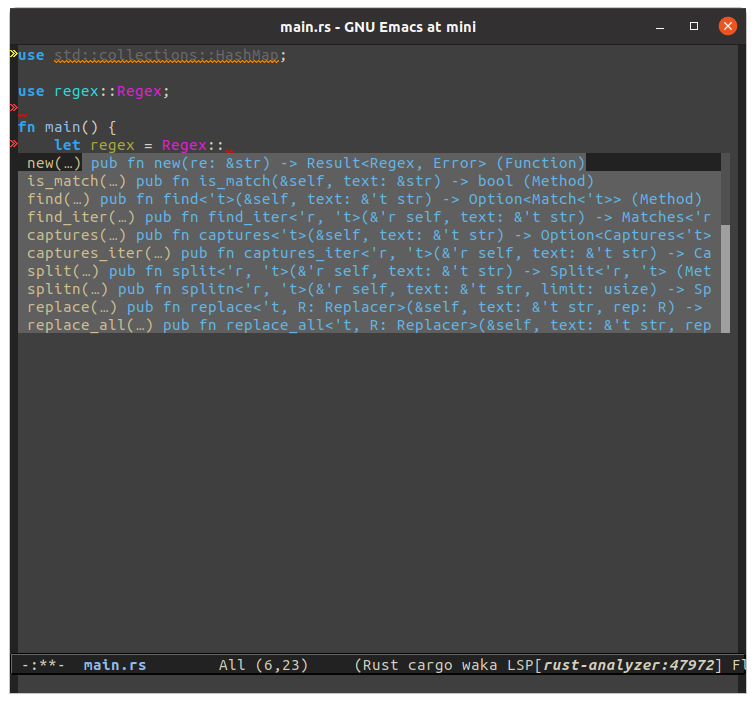
それではこれの型検査(cargo check)をしてみましょう。
cargo-minor-modeの C-c C-c k を使います。

未使用アイテムの警告が出て、エラーが0なのでチェックは通っているようですね。
発展編
普段の開発では私は以下の機能をよく使います。
- LSPの補完
- LSPの定義ジャンプ(
M-.)と元の場所に戻る(M-,) - LSPのActions(
s-l a a) - cargo-minor-modeのcheck(
C-c C-c k)- Rustの型検査だけやってくれる
cargo checkを起動する
- Rustの型検査だけやってくれる
- cargo-minor-modeのcheck(
C-c C-c K)- Rustのlinterの
cargo clippyを起動する
- Rustのlinterの
- cargo-minor-modeのtest(
C-c C-c t)- テストを走らせる
cargo testを起動する
- テストを走らせる
- cargo-minor-modeのadd(
C-c C-c a)- cargo-editプラグインの依存パッケージ追加コマンド
cargo addを起動する
- cargo-editプラグインの依存パッケージ追加コマンド
C-c C-c kのあとのM-g M-n/M-g M-p(next-error/previous-error)- Cargoの出したエラーの起きたソースの位置に飛べる
そんなに多くないので簡単に覚えられると思います。 このうち、Actionについて知らないと分からないと思うので説明しておきます。
LSPにはActionというものがあるようです。 コードの特定の場所にカーソルを合わせたときにLSPサーバがActionを提示できるならそれが表示されます。 例えば変数のリネームなどです。
rust-analyzerは結構面白いActionを提示してくれます。
例えば以下は match の空の腕の部分にカーソルを合わせた状態です。

右上に赤字で表示されているようにパターンが足りていないのでエラーになります。 その下に “Fill match arms” とありますね。これがActionです。
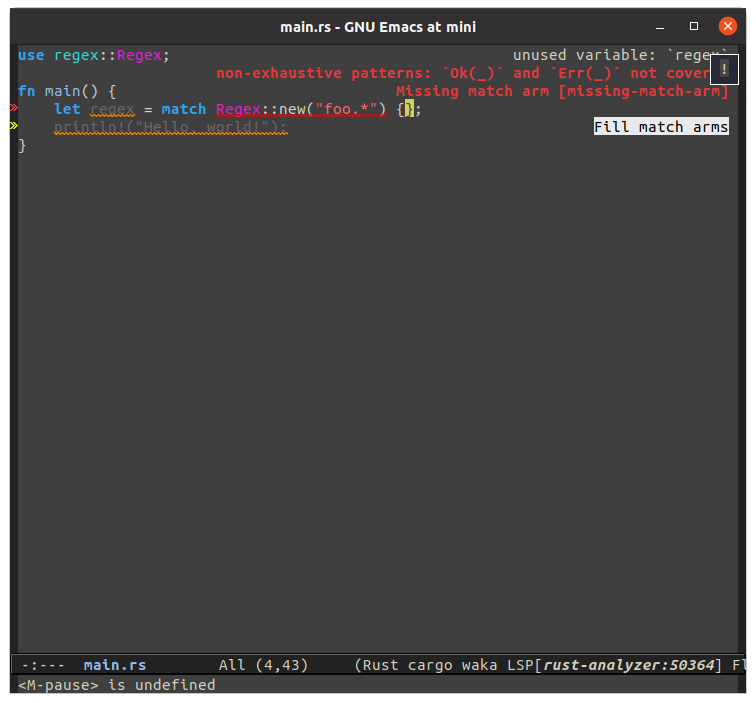
このActionを実行してみましょう。マウスを使ってクリックするか、s-l a a と入力すると実行できます。
上の画像はマウスカーソルを合わせたところです。Emacsでもマウス操作ができるんですね。
なお、yasnippetが必要なので yas-minor-mode がonになってるかは確認しましょう。
Actionを適用すると以下のように補完されます。
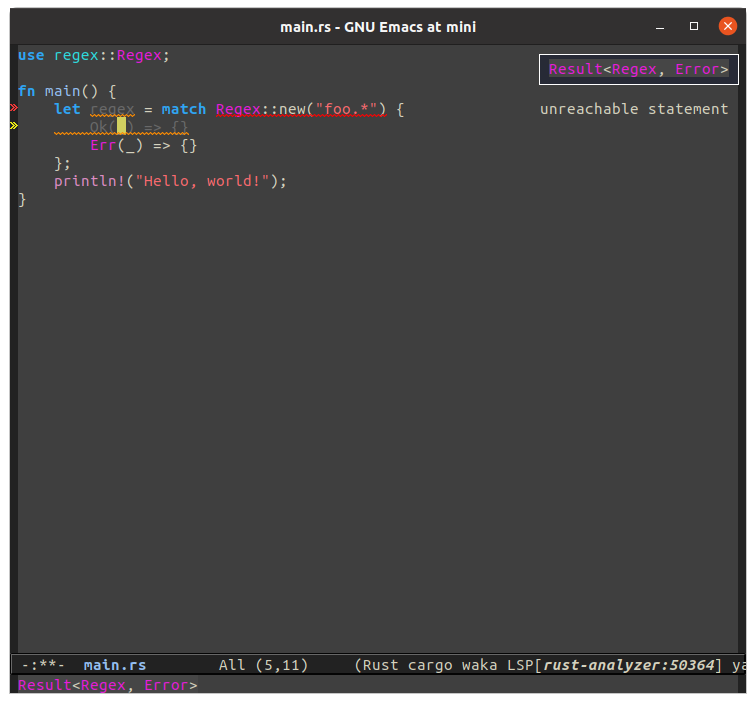
今回なmatchに必要な Ok と Err が補完されています。
型までみて賢く動作してくれるんですね。すごいですね。
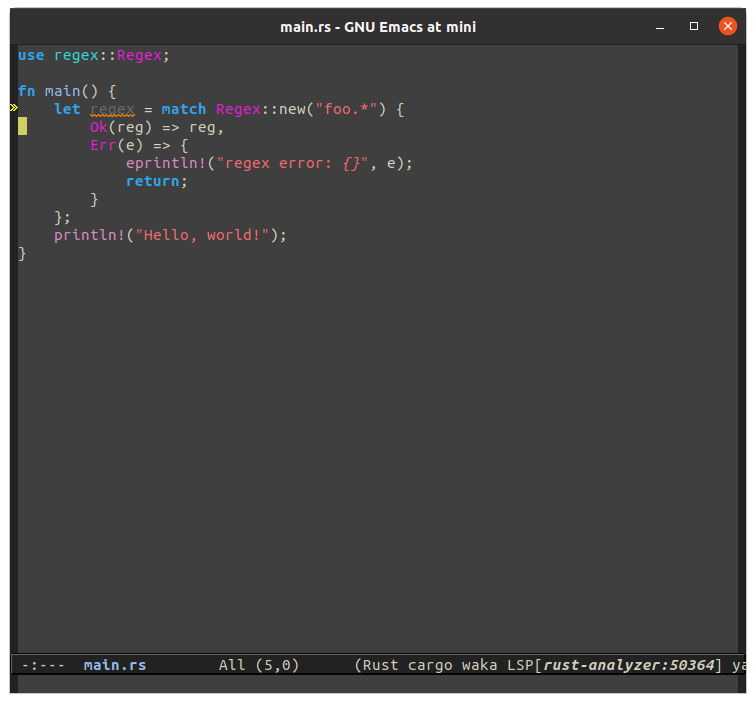
あとはこれを埋めてコードを完成させましょう。
便利ですね。
まとめ
Rustのツール群のインストール方法、Emacsのセットアップ方法、Emacsでの開発環境を紹介しました。
-
毎週のリリースの他に毎晩のプレリリースもあり、そちらも通知されてしまいますが、私は我慢して表示させるがままにしています。 ↩︎